Search This Blog

Thursday, April 21, 2016

Rhodes Kingfisher - New Oar Locks

It's been a long winter but spring has come to New Hampshire in full force, and I'm chomping at the bit to take this little guy (and my Catalina 22) out for a sail.  One of my desires with my Kingfisher was to be able to row it as well, either as a tender, or if I'm out sailing and the wind dies.  I already have a nice set of 7.5' oars for my Dyer Dhow dinghy.  I put new leather protection on these over the winter.  On the Kingfisher, I bought some stock Perko Oarlocks (4 in total).  My friend Joe has a woodshop and he took a piece of 1" thick mahogany I had laying around and made me some blocks to raise the oarlocks above the lip on the gunwale.  I through-bolted them using 2" #10-24 stainless machine screws and nylock nuts.  I made a backing plate out of an old 1/2" kitchen cutting board.  

Maybe I'll get this out for a row and a sail this weekend at the Massabesic Yacht Club.  

Fair winds! 


Closeup of the forward port oarlock.  I should have clearance over the chainplate, even if the mast is up and the shrouds are installed.  The forward one will really only be used if I do not have the mast stepped though as it is stepped right where I would sit.  


Rear port oarlock.  This will be the one used most often.


Saturday, February 20, 2016

Tippecanoe T27 RC Sailboat - Sail Numbers

I'm fortunate that two of my fellow Massabesic Yacht Club sailors purchased and built Tippecanoe T27s over the off-season.  So we have a fleet to race!

That being said, we need a way to distinguish our boats and what better way than by sail numbers.  

I printed out a catalog picture from a website that sells real sail numbers and using MS Paint, sized the picture so the numbers were about 2" high.

I cut these out using a sharp blade, and traced these onto the back of Contender Insignia sailcloth.  This is paper backed with adhesive.  These were then put onto the sail.

I like the way they turned out, and made a set for each of my friends too...  Dave with hull #888 and Wally with hull # 872.

I can't wait for our first race!


Thursday, October 15, 2015

A new machine! - Sailrite LSZ-1

A different type of machine, but a new one nevertheless.

A few years ago, my mother-in-law gave me her old sewing machine - a Singer 723k that was probably made in about 1960.  This machine's first project was building a set of signal flags ...  a kit that my wife bought me for Christmas from Sailrite.  That got me started on sewing and making things for the boat, such as a boat cover for my former Stuart JC9 sailing dinghy that I no longer own.

I then started to take old sails into tote bags using a design inspired from Sailrite's YouTube channel.  This led my friend Janet to offer me a better machine, an industrial Brother Exedra B40.  The commercial machine needed 220v power so I purchased a Reliable 110v replacement motor, and the machine has been impressive.  However, it's biggest shortcomings were twofold - it was not a walking foot machine (required for consistent stitching in heavy materials), and it only sewed straight stitch.  I really needed a new machine. 

Having become a big fan of Sailrite, I had been watching this machine for a few years now.  Finally, I decided to take the plunge on an LSZ-1 package.  They were having a 10% off sale, which was enough for me to go ahead and order one.

It arrived yesterday, and has just about the best packaging I have ever seen in a product.  The setup instructions were clear, and they even included a DVD to back up the instructions.  Everything was there including a spool of V-92 thread.  I actually used it last night to finish a tote back I had started with the Brother.  I sure do like having zig-zag stitching in my arsenal.

Stay tuned to this site for more project posting.  I have a backlog including tote bags to see at a craft fair, new sheet bags for the Catalina, a cover for my generator, and some more sail repairs.  


Tuesday, October 13, 2015

Rhodes Kingfisher - mains'l insignia


An original sail that appears to have been shortened.  The logo can be used as a template.


I traced the old logo onto a scrap piece of sailcloth with a pencil and cut it out with scissors and a sharp razor blade.

The template was traced onto the back of black Contender Insignia Sailcloth and cut out with scissors (a blade would have been better).


Logos cut out.  One is a mirror image of the other for each side of the sail.


I used the old sail for approximate measurements, removed the paper backing to reveal the adhesive and applied it to the sail.


Scratch made letters also on Contender sailcloth.


Numbers applied.


Monday, August 31, 2015

Rhodes Kingfisher - First Sail


Well, this past Saturday (8/30/15), I had the opportunity to sail this little craft for the first time.  I was able to get a small trailer from a fellow sailor at the Massabesic Yacht Club that fits perfectly.  I only had to adjust the bow mount and it doesn't even need a winch.   When I launched the boat, it just floated off.  When I retrieve the boat after sailing, I just pulled it up by the bow line.  

(As a reminder, we are NOT allowed to get our feet in the water at Massabesic Lake since it is a reservoir for Manchester, NH)


The mast crutch was made out of a scrap 2x6.  I put two bent bolts that go into the rudder mount.  Everything was strapped down with ratchet straps.  The whole thing is fairly light so it tows easily with my wife's 2007 Honda CR-V.  


On arriving at the Yacht Club, a friend came over and helped me step the mast.  It is light enough to step yourself but an extra set of hands is always welcome.  Once stepped, I attached the two shrouds and forestay.   I also made sure I put the windex, jib and main halyards on the mast BEFORE stepping it.

I then launched the boat, and rigged it in the water from the dock.  I think the whole operation took maybe 20 minutes.  (Derigging was equally as easy).  One must remember to drop down the center board before sailing off and raising it before pulling it back out.


From these pictures, you can see I sailed it away from the dock in very light air.  Fortunately, as you can see in the bottom picture, there was a line of air farther out from the mooring field, so I could get the boat moving some.  

It was a blast to sail.  Being used to sailing a Catalina 22, I was reminded how responsive (and tippy!) a small dinghy can be.  I kept her pointed up the whole time (a good thing) but felt very safe in her.

The only complaints are the jib and jib sheets.  The jib luff cannot be tightened - it is either too long or is stretched.  I may make another jib for it out of a scrap sail over the winter.  The cleats for the jib sheets are a little iffy with holding the trim under load.  I'd rather have cam cleats and may raid my Catalina for a few that are not being used, or just buy new ones.  Fortunately, parts for a dinghy are inexpensive when compared to my Catalina which in turn is cheap compared to a 40 footer :-)

As a 6' 1" 200 lb. 50-year old, I spent most of my time sitting or kneeling on the floor of the cockpit.  That's not going to work for too long.  So, I am already planning on adding two benches (my early version of the Kingfisher does not have the seats that newer ones have - see other pictures).  I will make these out of wood - preferably something classy looking.  

Other improvements I think I'll consider are:

- painting the topsides, inside of the cockpit and all the blue.
- adding a boot stripe and maybe painting the bottom a different color (maybe even use VC17 although I don't intend on ever leaving it in the water)
- Give her a name - I'm thinking of "Barchetta", which is Italian for "little boat".  No, I'm not painting her red - don't ask Rush fans :-)


(Update 9/4...  My friend and fellow sailor Wally V (Hunter 23 "Freebird") came out on the club launch and took this picture of me under sail :-)


Tuesday, August 11, 2015

Rhodes Kingfisher - positive floation

There is a good bit of the original positive floatation still in the boat under the stern seat and under the bow.  But I did remove some and wanted to add more.  I have had considerable luck with using swim noodles in the past with my Mariner and decided to do the same here.

My wife got them for $1.00 each at the Dollar Store or Target.  I got 16 of them and put 8 in the bow and 8 in the stern.  I bundled 4 together with duct tape.  They are out of the way and should not interfere with any gear while sailing.

In this picture, you can also see my high-tech bailer made out of a detergent container.  I am trying to keep this on the cheap.


Rhodes Kingfisher - dolly and assembly

After flipping it over after the paint dried for a few days, I installed the rudder gudgeon mount permanently.  I used stainless steel 1/4"x20 bolts with nylock nuts and washers - all left over from another project.  Each was sealed with butyl tape.  Using 8 bolts is probably overkill but it sure beats the rotted piece of wood that was there when I picked up the boat.

I also removed and reinstalled the cleats for the jib sheets, backing them with 1/2" starboard plates - also overkill but that's how I roll.

Finally I replaced the two pad eyes on the top of the transom where the traveller will connect.  (See a future post on rigging).


The rudder mounted right up and looks great.  I did drill a hole in the bottom pintle, and have a cotter pin attached with a cable as a safety measure so I don't lose this rudder, which is pretty-much irreplaceable.  


I reinstalled a new bow eye - and spliced a nice painter from what I think is an old luff rope from a donated sail for my sail bag projects.  


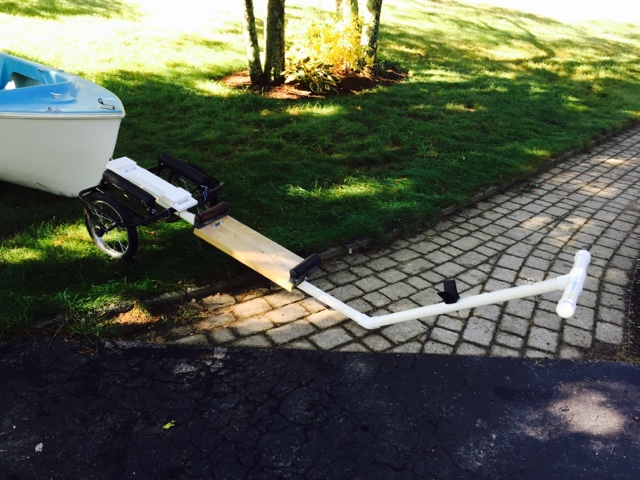
The dolly was made from a kayak dolly, along with some PVC pipe, scraps of wood and Azec, and the rollers I scavanged from the scrap trailer.  I found the rubber bow piece at Bass Pro Shops.  The dolly works great to move the boat around...  but, I'm not happy with it.  When I pull the boat on the dolly up on my utility trailer, it sits very high and transport will be a pain.  I think I'll revert to a small boat trailer.  One of my fellow Massabesic Yacht Club sailors may have a small trailer to sell me.  That will be my preferred method.


She's looking good.  I love the blue color and it reminds me of one of my first sailboats - a 1968 O'Day Mariner with the same colors.  I can see the resemblance - of course both were designed by Phillip Rhodes :-)

Next year, I may repair some cracks in the blue and repaint the entire top of the boat, along with doing the bilge in gray bilge paint.